Tape-in hair extensions have become the go-to solution for clients who want longer, fuller hair that looks natural and feels lightweight. These innovative extensions provide a seamless blend, minimal damage, and versatility, making them a favorite among professional stylists and beauty enthusiasts alike.
But installing tape-in extensions isn’t just about applying tape and hoping for the best—proper installation requires precision, technique, and knowledge to ensure stunning results. If you’re looking to perfect the art of tape-in extension application, this guide is your step-by-step roadmap.
What Makes Tape-In Extensions a Popular Choice?
Tape-in extensions are revered for their ability to revolutionize any hairstyle, offering benefits that make them stand out from other extension methods. Here’s why they’re so popular:
- Natural Appearance: The flat tape bonds lie close to the scalp, blending seamlessly with natural hair.
- Lightweight and Comfortable: Unlike bulky methods, tape-ins are lightweight and don’t tug on the scalp.
- Quick Installation: They’re faster to apply compared to fusion or sew-in extensions, saving both client and stylist time.
- Minimal Damage: When installed correctly, tape-ins pose little risk to natural hair, making them a safer option for clients.
Understanding these benefits will help you position tape-in extensions as a top-tier option for your clients.
The Basics of Tape-In Extensions
Before you begin installing extensions, understanding the different types and their quality indicators is essential.
Types of Tape-In Extensions
There are various types of tape-in hair extensions available, often differing in these key areas:
- Hair Origin: Extensions can be made from human hair or synthetic fibers. Opt for 100% Remy human hair for a natural appearance and longevity.
- Tape Adhesive: High-quality tape strips ensure durability and prevent slipping. Avoid cheap adhesives that compromise performance.
- Thickness and Lengths: Extensions vary in thickness and length, so choose pieces tailored to the client’s desired look.
Why Choose Tape-Ins Over Other Extension Methods?
Compared to clip-ins, sew-ins, or pre-bonded extensions, tape-ins are less damaging, more lightweight, and more versatile. This makes them ideal for clients looking for a semi-permanent solution that doesn’t compromise hair health.

Preparing for Installation
Successful tape-in extension application starts long before the installation process. Proper preparation helps prevent mistakes and ensures the best possible results.
1. Consultation with the Client
Schedule a thorough consultation before the appointment to understand the client’s objectives. Key points to cover include:
- Desired length, volume, and style.
- Hair texture and suitability for tape-ins.
- Review of aftercare and maintenance expectations.
2. Selecting the Right Extensions
Choose extensions that match the client’s natural hair color, texture, and density. Consider investing in high-quality products to boost client satisfaction and elevate your services.
3. Preparing the Client’s Hair
Properly clean the client’s hair with a clarifying shampoo to remove any oils or product buildup that could interfere with the adhesive. Allow the hair to dry completely before starting installation.
Step-by-Step Guide to Installing Tape-In Extensions
Precision and proper technique are vital when installing tape-in extensions. Follow these steps carefully for flawless results.
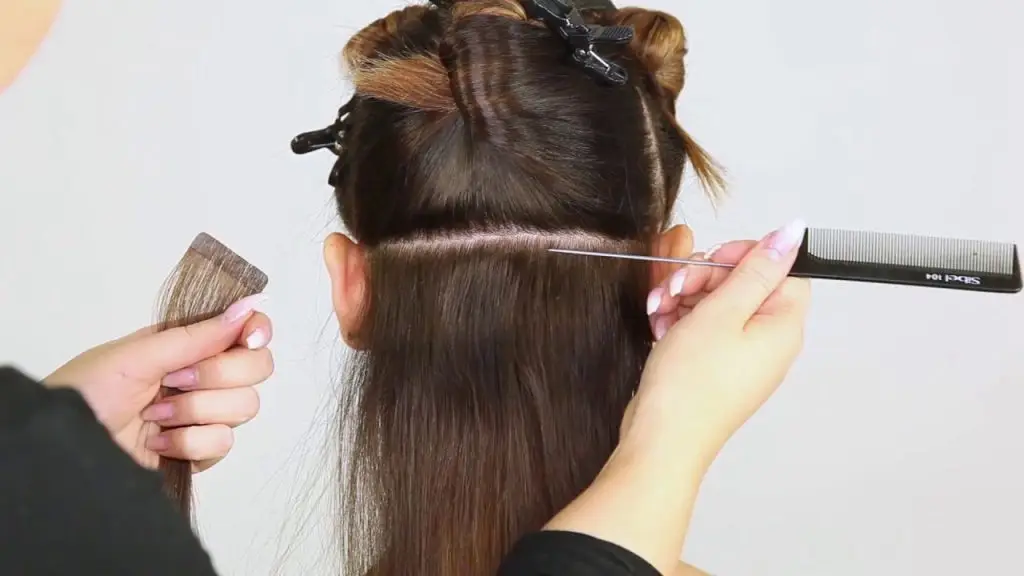
1. Section the Hair
- Divide the hair into neat horizontal sections using clips.
- Start at the nape of the neck and work your way upward for even placement.
2. Prepare the Extensions
- Remove the backing from the tape.
- Use clean hands or tools to avoid contaminating the adhesive.
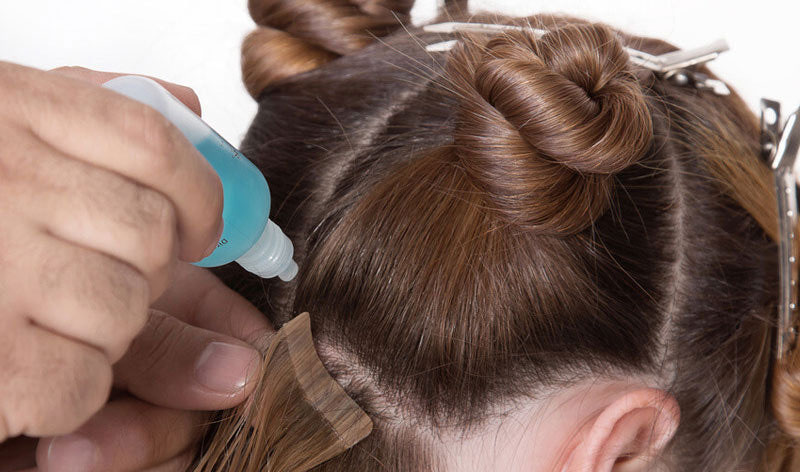
3. Apply the Extensions
- Take a thin section of the client’s natural hair, ensuring it’s no thicker than the tape itself.
- Sandwich the section of hair between two tape extensions, pressing firmly to secure them in place.
4. Check Alignment and Placement
- Align the extensions carefully to avoid placing them too close to the scalp, which can cause discomfort or tension. Leave about 1 cm of space between the tape and the scalp.
5. Blend and Style
- Check that the extensions blend naturally with the client’s hair.
- Style the hair to ensure the final look is cohesive and polished.
Read more: Pros and Cons of Tape-in Hair Extensions
Aftercare and Maintenance Tips
Your work doesn’t stop after the installation—educating clients about proper care is crucial for maintaining the longevity of their tape-in extensions.
- Use Sulfate-Free Products: Encourage clients to use gentle, sulfate-free shampoos and conditioners to prolong the lifespan of their extensions and protect the adhesive bond. Sulfates can strip natural oils and weaken the tape, leading to slippage or damage. Recommend washing hair no more than 2–3 times a week with lukewarm water for best results.
- Avoid Heavy Oils: Oils can break down the adhesive used for tape-in extensions, so they should be kept away from the scalp and roots. Suggest clients use lightweight, water-based styling products instead and remind them to check product ingredients before applying anything near the bonds.
- Gentle Brushing: Recommend using a loop brush or a wide-tooth comb to carefully detangle the hair without snagging or pulling on the extensions. Advise clients to start brushing from the ends and work their way up to minimize tension on the tape bonds.
- Regular Maintenance: Advise clients to schedule maintenance appointments every 6–8 weeks to ensure the extensions stay in place and remain blended with their natural hair. During these touch-ups, the extensions can be repositioned or replaced as needed, keeping the look fresh and natural.
Avoiding Common Mistakes
Even experienced stylists can make errors when installing tape-in extensions. Here are some mistakes to avoid:
- Using Too Much Hair in Each Section: This reduces the adhesive’s grip and causes slippage.
- Ignoring Proper Hair Preparation: Oily or dirty hair leads to poor adhesion.
- Placing Extensions Too Close to the Scalp: This causes tension, discomfort, and breakage.
- Skipping Maintenance Appointments: Neglecting touch-ups can result in visible tapes and reduced longevity.
By avoiding these pitfalls, you can ensure your clients leave the salon satisfied with their stunning new look.

Your Perfect Tape-In Journey Starts Here
Mastering the art of tape-in extension installation not only enhances your skills as a professional but also builds trust and loyalty among your clients. By offering expertly applied extensions, you create stunning transformations that boost your reputation in the beauty industry.
If you’ve found these tips helpful and want to learn more, why not book a consultation with our salon team? We’re here to help you refine your craft, select the best products, and create hair magic for your clients.
Elevate your skills—start your tape-in extensions success story today.

